SETTINGS
Appearance
Language
About

Settings

Select a category to the left.

Appearance

Theme

Light or dark? Choose how the site looks to you by clicking an image below.

Light Dark

Language

Preferred Language

All content on utk.claranguyen.me is originally in UK English. However, if content exists in your preferred language, it will display as that instead. Feel free to choose that below. This will require a page refresh to take effect.

About

"utk.claranguyen.me" details

Domain Name: claranguyen.me
Site Version: 3.0.1
Last Updated: 2019/08/18
Getting Started
Synopsis
  • Read the lab writeup on Canvas.
  • This lab is due on September 5, 2017 at 23:59:59.
Requirements
  • Arduino Due
Synopsis
Welcome to your second first real lab of CS130! In this lab, you will be testing your abilities of converting between bases. It is very important that you know how to convert between Decimal, Hexadecimal, and Binary. Octal... not so much (but it's used for file permissions, mind you). This lab will also put your Arduino Due boards to the test. You will be coding in Arduino's variant of C++.

The program you will be writing will take a number as input, and then output its binary, hexadecimal, and octal forms.
The Serial Monitor
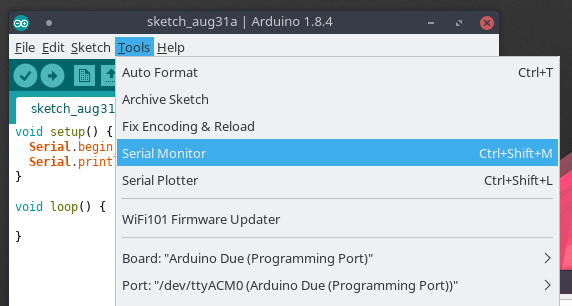
Before I get to introducing how to input and output values to you, I want to show you how exactly Arduino accepts input and shows output. Introducing Serial Monitor. To access it, go to the Toolbar. Then "Tools" -> "Serial Monitor" (or Ctrl+Shift+M on Windows).


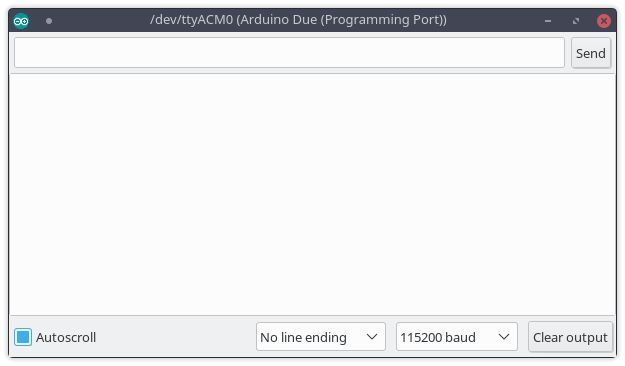
When you click this, a window will show up. Behold.


This is what you will be using throughout the entire semester for inputting and outputting data from your Arduino. The top text box is for your input. The bottom (huge) text box is for what your Arduino outputs.

Please do note the 115200 baud at the bottom right. If yours isn't set to that, set it to that value. The example below will show us how to use the Arduino to print text to the Serial Monitor.
Printing output on the Due
Chances are that you are used to this kind of syntax...
Code (C++)
cout << "Hello World!" << endl;
I hate to break it to you, but Arduino changes the rules of the game a little. The Serial Monitor is your console window that will show you all information going on with your program. And we will be using Arduino's Serial library in order to get input.

Here is an example of accepting input on the Arduino.
Code (C++)
void setup() {
	Serial.begin(115200);
	Serial.println("Hello World!");
}

void loop() {
	//Nothing here. But "loop()" must exist.
}

"Wait Clara! What is all of this? Where is my main() function?"

You're probably used to all programs having "main()" from CS102. I told you Arduino changes the game a little. Instead of main(), you have these functions:
  • setup() - Runs at the very beginning of the program.
  • loop() - Runs after "setup()", and runs in an infinite loop forever.
To ease the potential pain and frustration you may have, just pretend that "setup()" is your main function... because it sure does act like it.

"What about Serial.begin and Serial.println?"

These functions are related to the Serial Monitor, which is where you input values and also see what your Arduino Due outputs.
  • Serial.begin - Sets the rate of data transmission to and from the Arduino device. We will use "115200". If this value is set incorrectly, you almost certainly will get garbage data. Here is documentation of Serial.begin.
  • Serial.println - This should be obvious from how it's used up above. You type text in, and it prints it to the Serial Monitor. It also prints a newline after the text (kind of like what "endl" does in standard C++). Here is documentation of Serial.println.

Now that you know this, let's look back at that code one more time:
Code (C++)
void setup() {
	Serial.begin(115200);
	Serial.println("Hello World!");
}

void loop() {
	//Nothing here. But "loop()" must exist.
}

You should now be able to tell that the Serial monitor is running at 115200 baud (basically bits per second). And when the program runs, it will print "Hello World!" to the Serial Monitor.

You aren't restricted to just using Serial.println to print output. There are also other functions such as Serial.print which prints text without the newline at the end (documentation for it).

Finally, here is what the program outputs to the Serial Monitor:

Input String Data
So you got to output text. That's fun, I guess. Now what about reading input?

Let's build off of the code from the last example, and add the ability to print whatever we input verbatim.
Code (C++)
void setup() {
	Serial.begin(115200);
	Serial.println("Hello World!");
}

void loop() {
	if (Serial && (Serial.available() > 0)) {
		String input = Serial.readString();
		Serial.println(input);
	}
}

Breaking it down

The lines you want to pay attention to are here:
Code (C++)
String input = Serial.readString();
Serial.println(input);
Yes... the string class in the Arduino library starts with a capital "S". That is bound to confuse someone. Anyways... Serial.readString (Documentation) is used to read data from the Serial Monitor, and put it in a String. And if you remember from the previous section, Serial.println will print the contents of that String to the output module of the Serial Monitor.

Why "if (Serial && (Serial.available() > 0)) {"?

Well try running it without those and see what happens.

Ahem, remember this is going on in the "loop()" function. Think of it as a while(1). As it turns out, there are a few checks that we would have to do before we get to actually accept input. Otherwise, it will constantly try to read from the Serial Monitor and print blank lines. The Serial.available (Documentation) function tells us how many bytes are available for reading from the Serial port (the input). If it is 0, the user clearly didn't input anything, so why waste our time trying to read an empty string and then print a blank line? As for the statement before Serial.available()... if (Serial) (Documentation) simply checks if the Serial port (input...) is even ready for input. If that fails, you have no reason to read input as it will fail too.

What if I wanted to convert that string to an Int?

Take a look at toInt()'s documentation here. Basically do something like this:
Code (C++)
String num_txt = "1234";
int num = num_txt.toInt();
Note: This function acts like atoi() (it is probably a wrapper for that function). The function will scan the String from left-to-right and stop when a non-number character is hit. This means that if the string does not contain a valid number at the start, it will return "0". So "a1234" will return "0". However, if the string was "12a34", then it would return "12".
Lab Simulator
Sometimes screenshots of the lab assignment isn't enough. Some students want to see the program in action first in order to further understand it. I have taken the liberty of writing a simulator which does exactly what the lab is supposed to function as. Feel free to use it to further understand how the lab is supposed to work.

COSC 130 - Lab 2 Simulator