SETTINGS
Appearance
Language
About

Settings

Select a category to the left.

Appearance

Theme

Light or dark? Choose how the site looks to you by clicking an image below.

Light Dark

Language

Preferred Language

All content on utk.claranguyen.me is originally in UK English. However, if content exists in your preferred language, it will display as that instead. Feel free to choose that below. This will require a page refresh to take effect.

About

"utk.claranguyen.me" details

Domain Name: claranguyen.me
Site Version: 3.0.1
Last Updated: 2019/08/18
Introduction
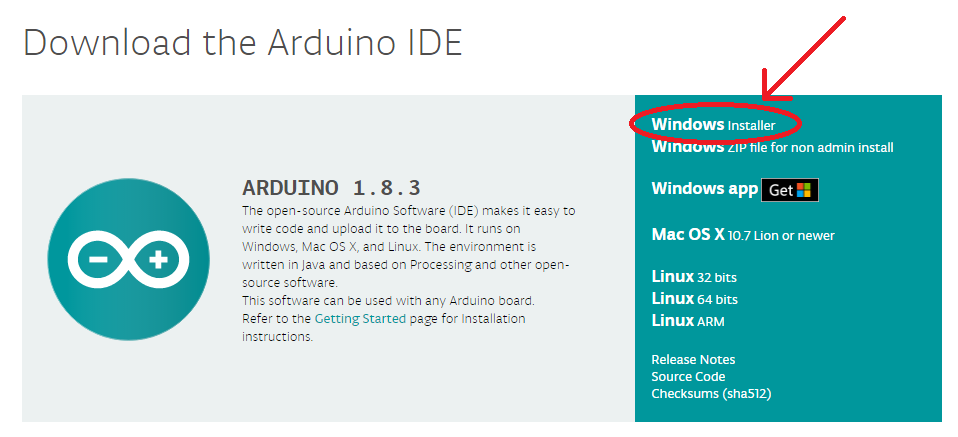
Chances are that you are reading this because you are taking CS130 and need help installing the Arduino IDE. This was a frequent issue last semester, so here's a guide if struggle occurs.

Note: This is for Windows users. If you want it on Mac, I might get to it but I don't have a Mac. As for Linux, I'll type that up shortly.
How to get it?
Go to Arduino's website (more specifically, https://www.arduino.cc/en/Main/Software) and scroll down to "Download the Arduino IDE". Since this guide is oriented toward Windows users, obviously you are going to click the "Windows Installer" button.

If you do not understand what I am talking about, look at the screenshot below:


It'll take you to a page that asks for a donation. I'll leave it up to you whether or not to donate. If you don't want to do so though, press "Just Download".

The file will take a while to download, but after it is done, run it. Agree with the terms and conditions and just spam the hell out of the "Next" button until it is installed. It'll take around 5 minutes to actually install. It will also ask to install something from "Adafruit Industries", along with the Arduino USB Driver. Allow those to install or else you can't use your Arduino for this class.


Yes, you literally have to click "Close". It won't just close automatically for you... but at least it tells you when it's completed!
Installing Arduino Due Support
Assuming you actually installed the IDE correctly, open it up (you can search for "Arduino" if you can't find it by other means). You'll be presented with something like this:


Now, go to "Tools" -> "Board: Arduino/Genuino Uno" (if it actually says that) -> "Boards Manager..." as shown here.


So to "clara"-fy, this class uses the Arduino Due boards. These are outdated models and are not initially supported by the Arduino IDE. The Boards Manager allows us to install additional modules, and one of them supports the Arduino Due. At the top where it says "Filter your search...", type "Due". It should filter the results to the modules that support the Arduino Due. The "Arduino SAM Boards (32-bits ARM Cortex-M3)" one is what we want. Click it and an "Install" button will appear. I think it's obvious what you should do next...


Restart your Arduino IDE, have your Arduino Due plugged in, and be prepared. We are going to test if it actually works.
Testing the board
Let's actually make sure the thing works before you go off trying to do your lab assignments.

Go back to "Tools" -> "Board: Arduino/Genuino Uno" and look at the very bottom. You will see "Arduino Due (Programming Port)". If you don't see this option, you messed something up with your installation.


Once it's clicked, you are almost set. Go back to "Tools" and click "Port". Select the one that says "Arduino Due (Programming Port)" too.

Let's test the board.
  1. Copy and paste code I wrote here (or just open the file in the Arduino IDE).
  2. Then click the "Verify" button (It's right under "File", has a check mark).
  3. If there are no errors that pop up in the console below, click the "Upload" button (The button with an arrow facing to the right).
  4. Wait for it to say something like "CPU reset". Then go to "Tools" -> "Serial Monitor" (or press "Ctrl+Shift+M"). A Serial Monitor will open.
  5. In the Serial Monitor, set the rate to "115200 baud". Press whatever buttons on the shield you like. It should look like this:


If you were able to do all of this, congratulations, you have set up your Arduino properly and are ready to do lab assignments!
Guide Information
Basic Information
Name: Installing Arduino IDE (Windows)
Description: Because without it, you won't pass the class.
ID: arduino_install_win
File Information
File Size: 6.26 KB (6410 bytes)
Last Modified: 2019/08/17 22:15:01
Version: 1.0.0
Translators
en-gb Clara Nguyen (iDestyKK)